Observables

WebSerial.app - Browser to USB Serial Communication With Svelte

 Published: Feb 5, 2021  (last updated: Feb 12, 2021)~ 200 words~ 1 minutes reading time

After my previous experiments with the Web Serial API, I started experimenting with Svelte .

Within a couple of days I have created https://webserial.app/ - the Web Serial Controller app.

The interface might seem familiar - it’s based on XP.css - a Windows XP CSS theme. It was inspired by some of the Serial hardware software used in the 00’s.

The interface of Web Serial Controller

The application is fully open source and features:

  • Fully connected state - use the screens or keyboard shortcuts to connect and disconnect from devices with shared state
  • Filter devices by vendor ID with a fully searchable list of all hardware vendors
  • A draggable interface XP-like interface
  • Options storage in localStorage
  • Send text messages to any connected device

Web Serial API with RxJS - Two-Way Reactive Communication between Browser and Serial Hardware

 Published: Jan 30, 2021  (last updated: Feb 12, 2021)~ 1100 words~ 6 minutes reading time

Version 89 of Chrome and Edge browsers have released the Web Serial API unflagged which means as user it’s now available for general use rather than being locked behind experimental flags (if you’re on an earlier version you can enable Experimental Web Platform features in chrome://flags)

The API allows for communication between the browser and supported serial hardware such as Arduino or RaspberryPi over USB Serial connection - the device registers as available to the browser and a port can be opened.

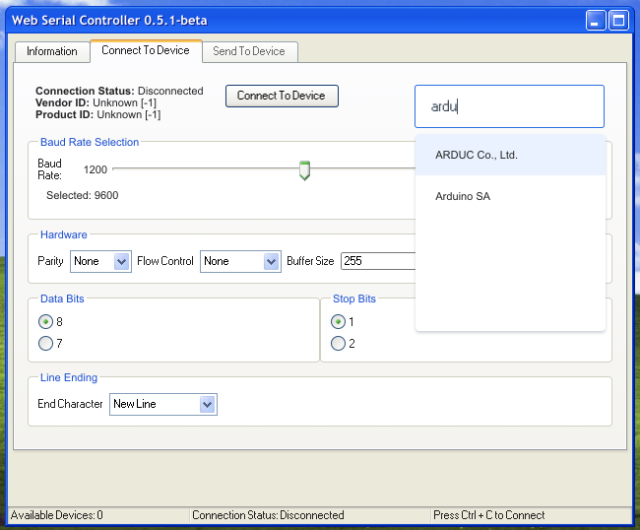
If you don’t have any hardware to connect to, you can easily test it using a Bluetooth Serial connection - provided your computer has a Bluetooth module you can connect your mobile device to it and use the appropriate software.

Connecting Browser to Hardware

To request access to a device, a call needs to be made to the newly available function navigator.serial.requestPort:

 1
 2
 3
 4
 5
 6
 7
 8
 9
10
11
const startButton = document.getElementById("start");

startButton.addEventListener("click", async event => {
  try {
    const port = await navigator.serial.requestPort();
    // We can now access the serial device by opening it
    // e.g. await port.open({baudRate: 9600})
  } catch (e) {
    // The prompt has been dismissed without selecting a device.
  }
});

This function is part of a set that must be called from a specific set of user interactions such as touch or click events - in the demo after a user gesture such as a button click - you cannot just call requestPort from your code without some kind of user interaction as this will cause a security violation. You also must call it from a location that does not have policy set up to disable this (you can see this in the demo above - if you try run it in the editor it won’t work due to the <iframe> not having the correct policy).

You may also need to install the w3c-web-serial types in your project to make sure you have the available types on the navigator object and global types such as SerialPort.

To get a port, call navigator.serial.requestPort inside the handler - it will return a Promise that contains the port object - you can also wrap it in a try/catch to handle when the user cancels device selection.

The port object once created must be called with the open method - the only required property of the options is the baudRate which is the maximum bits-per-second transferred but there are other options based on the requirements of the device.

Once opened the port can return a ReadableStream and WritableStream which allows data to be passed to and from the device.

Our RxJS Operator

To turn this into an RxJS operator we’ll consume the port and set up the functionality to both read and write to the serial bus. You can read the full source code to see how the final Observable was created, but we’ll cover the important sections below.

Reading from the Serial Bus

Once connected, the serial device can start sending data to us - as it’s a ReadableStream the result will be a UInt8Array.

Here we’ll set up an iterable reader for our stream - while the result is not done and the port is still readable, we’ll continue to read the source and emit it to the subscriber of the Observable. If the reader has completed, or the port has been closed we’ll end this iteration.

 1
 2
 3
 4
 5
 6
 7
 8
 9
10
11
12
13
14
15
await port.open({baudRate: 9600});

const process = async (
  result: ReadableStreamReadResult<Uint8Array>
): Promise<ReadableStreamReadResult<Uint8Array>> => {
  subscriber.next(result.value);
  return !result.done || !port.readable
    ? reader.read().then(process)
    : Promise.resolve(result);
};

if (port.readable) {
  reader = port.readable.getReader();
  reader.read().then(process);
}

As the output of our Observable is a Uint8Array. Depending on your needs you can decode this to the format you need, but in most cases it will be text content - here we can use a TextDecoder to get the value:

1
2
3
4
5
6
7
8
const decoder = new TextDecoder("utf-8");

fromWebSerial(port).pipe(
  tap(value => {
    // Value is a UInt8Array, we can append to a element by decoding it
    outputEl.innerHTML = decoder.decode(value)
  })
).subscribe()

Writing to the Serial Bus

The API also allows for writing data to the device, here we can use another Observable that emits a string and provide it to our function as a source, then we can hook it up to the ports WritableStream.

Instead of directly writing, we will create a TextEncoderStream - this allows us to create a new internal writer that we have more control over - it contains both a reader and writer we use this to connect our sources.

The reader from our encoder will be piped to the ports WritableStream, and the writer passed to toWritableStream which connects the Observable to the writer:

1
2
3
4
5
6
7
8
if (writerSource && port.writable) {
  const encoder = new TextEncoderStream();
  writerEnd = encoder.readable.pipeTo(port.writable);
  const outputStream = encoder.writable;

  writer = outputStream.getWriter();
  writerSource.pipe(toWritableStream(writer, signal)).subscribe();
}

Now we can pass the Observable and use it to emit our values:

1
2
3
4
5
const emitter$ = new Subject<string>();

fromWebSerial(port, emitter$.asObservable()).subscribe();

emitter$.next('Hello There!');

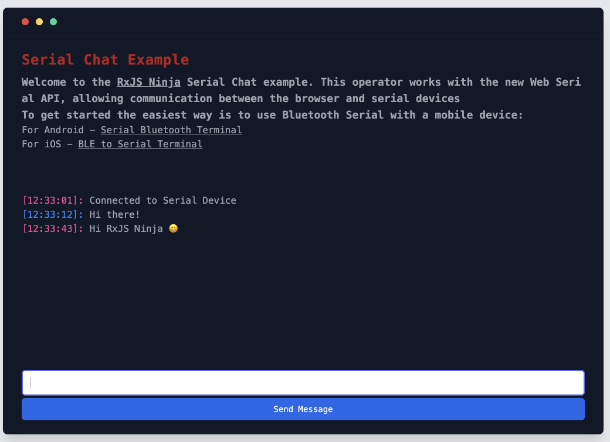
Creating a Serial Chat App

Now we can read from, and write to, our hardware device the possibilities are endless with what we can do - provided the hardware supports it.

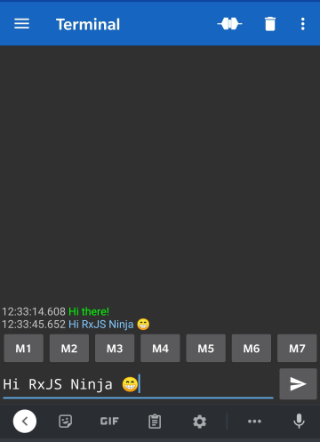
For this tutorial I build a very basic chat app - using the Bluetooth Serial applications mentioned above you can use it to send and receive text data between devices.

A screenshot of a web serial mobile app A screenshot of a web serial browser app

In the example code I’ve set up a button to enable our port request - you should see a popup with a list of devices available for you to use. After connecting a basic chat interface will show up - type in some text and check out your device software - you should see the same message there, and you can then send a message back to the browser.

Hopefully you’ve found this tutorial useful and if you do build something with this I’d love to hear about it!

A collection of pre-built operators and Observables for your projects

The RxJS Logo, a Ninja jumping over a moon

RxJS Ninja - is a collection of over 130 operators for working with various types of data (such as arrays , numbers ) and streams allowing for modifying, filtering and querying the data.

Still in active development, you might find useful operators that provide clearer intent for your RxJS code.

You can check out the source code on GitHub .

Create your own Dark Mode Detection Observable using RxJS and Media Queries

 Published: Jan 27, 2021  (last updated: Feb 12, 2021)~ 1100 words~ 5 minutes reading time

Demo Link

One of the more recent features available in browsers is ability to do CSS Media Queries based on user theme & accessibility settings in the operating system - for example using @media (prefers-color-scheme: dark) (see prefers-color-scheme ) you can check if the users OS theme is currently in Dark Mode and use this to set a websites theme accordingly.

The query is also available in JavaScript using the window.matchMedia function - that returns a MediaListQuery that will allow us to do two things:

  • The current value of the users setting via the matches boolean property
  • Any future values by listening to its changes event and attaching an event lister function to it

Combining these, it’s the perfect candidate to turn into a fully reactive dark mode switcher using RxJS and Observables that will give us the users current setting. If you’re not familiar with Observables, they are a type of stream that emits values over time - consumers can subscribe to these Observables to get their values - this means we can use them to get values from long running functions or event emitters.

In the full demo you’ll find an example page with light and dark mode set from your own OS settings. To see the full working example you need to change the setting (e.g. in OSX Dark Mode is under “General” settings) - also provided are a user toggle button, and a button to turn off and on the media query listener. The Observable in this example supports more than one prefers- type of query but in the tutorial below we’ll build a much simpler isDarkMode Observable than the one provided in the demo, but the concept is the same.

Creating a Dark Mode Observable

For our code we first need to create our Observable factory - this is our function that allows us to pass any required parameters for the implementation and returns an Observable which can then be subscribed to.

The Observable constructor takes a function - a callback any time there is a new subscription - this is where the implementation will live.

As soon as the subscription opens, we first check to see if window.matchMedia is available - it should be available in all modern browsers but is not available in environments like node (yay unit testing!) - so here we can throw an error.

The factory also accepts an optional AbortSignal , an object that contains an onabort callback - the parent of the signal is a AbortController and using this we can externally signal our Observable to close all subscriptions and remove all event listeners.

The return value of the constructor is another function - the teardown logic - this is called when an RxJS subscription is ended, such as using takeUntil or take(1) - here we also ensure that all subscriptions and event listeners are closed.

 1
 2
 3
 4
 5
 6
 7
 8
 9
10
11
12
13
14
15
16
17
18
19
20
import { Observable } from 'rxjs';

export function isDarkMode(signal?: AbortSignal): Observable<boolean> {
  return new Observable<boolean>(subscriber => {

    if (!window.matchMedia) {
      subscriber.error(new Error('No windows Media Match available'));
    }

    if (signal) {
      signal.onabort = () => {
        !subscriber.closed && subscriber.complete()
      }
    }

    return () => {
      !subscriber.closed && subscriber.complete()
    }
  });
}

Adding the Media Query

The main implementation of our Observable is to create our MediaListQuery and use it to emit values to any subscribers. On creation, contain a matches value of true or false which can be immediately be passed to subscriber.next.

We also need to bind a listener using to the change event of the query. As we also need to remove this later create an internal private function for the event handler - this will also call subscriber.next each time there is a detected change.

Also casting the event to a MediaQueryListEvent ensures TypeScript recognises it has the matches property which contains our value.

1
2
3
4
5
6
7
function emitValue(event: Event) {
  subscriber.next((event as MediaQueryListEvent).matches);
}

const mediaListQuery = window.matchMedia('(prefers-color-scheme: dark)');
mediaListQuery.addEventListener('change', emitValue);
subscriber.next(mediaListQuery.matches);

Cleaning up handlers and subscriptions

Already we can start to use the new Observable, but we also need to make sure that we:

  • End any subscriptions to the Observable when either the AbortSignal fires or RxJS unsubscribes from it
  • Remove any event listeners in the DOM for the change event

With a slight bit of refactoring we have our final Observable factory below - in both the signal.onabort and the Observable teardown logic we remove the event listener - the API for this requires you pass the function implementation from our private function.

 1
 2
 3
 4
 5
 6
 7
 8
 9
10
11
12
13
14
15
16
17
18
19
20
21
22
23
24
25
26
27
28
29
30
31
import { Observable } from 'rxjs';

export function isDarkMode(signal?: AbortSignal): Observable<boolean> {
  return new Observable<boolean>(subscriber => {

    if (!window.matchMedia) {
      subscriber.error(new Error('No windows Media Match available'));
    }

    function emitValue(event: Event) {
      subscriber.next((event as MediaQueryListEvent).matches);
    }

    const mediaListQuery = window.matchMedia('(prefers-color-scheme: dark)');

    if (signal) {
      signal.onabort = () => {
        mediaListQuery.removeEventListener('change', emitValue)
        !subscriber.closed && subscriber.complete()
      }
    }

    mediaListQuery.addEventListener('change', emitValue);
    subscriber.next(mediaListQuery.matches);

    return () => {
      mediaListQuery.removeEventListener('change', emitValue);
      !subscriber.closed && subscriber.complete()
    }
  })
}

Finishing up

Now we have a fully working reactive Observable for a Dark Mode media query, this can be used in any application or website to check the users theme setting. The demo provides some more example of how to do this in full.

1
2
3
4
5
6
isDarkMode().pipe(
  tap(value => {
    body.classList.removeClass(value ? 'light' : 'dark');
    body.classList.addClass(value ? 'dark' : 'light');
  })
).subscribe()

This tutorial is just one small example of the kind of things that can be done with RxJS - any API that can emit values over time can be turned into Observables.

A collection of pre-built operators and Observables for your projects

The RxJS Logo, a Ninja jumping over a moon

RxJS Ninja - is a collection of over 130 operators for working with various types of data (such as arrays , numbers ) and streams allowing for modifying, filtering and querying the data.

Still in active development, you might find useful operators that provide clearer intent for your RxJS code.

You can check out the source code on GitHub .